<VirtualHost *:80>
    ...

    DocumentRoot /<path-to-suite>/public
    <Directory /<path-to-suite>/public>
        AllowOverride All
        Order Allow,Deny
        Allow from All
    </Directory>

</VirtualHost>Downloading & Installing
The following documentation is for SuiteCRM Version 8+; to see documentation on the same topic for Version 7, click here.
1. Setup your webserver for SuiteCRM
The following documentation will use as base setup a LAMP stack: Linux, Apache, MySql and php. However, most of the steps may apply to other webservers and databases
1.1 Install required software
Install the platform-appropriate version of the following:
-
webserver:
apache -
php -
database:
mysqlormariadb
See the Compatibility matrix to ensure you have the correct versions of the required softwares.
there are other software dependencies on the Compatibility matrix, however those are the ones required for a development environment.
When installing SuiteCRM from pre-build installable package zip you do not need to install the dependencies that are for development, namely: node, angular cli, yarn/npm.
The SuiteCRM 8 pre-built installable package zip comes with the pre-built front end files under public/dist and all the required libs on vendors.
Helpfull Resources
On how to install a development LAMP stack on Ubuntu:
1.2 Install required php modules
Install on your server the required php modules:
-
cli
-
curl
-
common
-
intl
-
json
-
gd
-
mbstring
-
mysqli
-
pdo_mysql
-
openssl
-
soap
-
xml
-
zip
-
imap (optional)
-
ldap (optional)
Helpfull Resources
Please check the Helpfull Resources section from Install required software for instructions on how to install php modules
1.3 Configuring URL re-writes
In order for api routes to work you need allow url re-writes.
-
All SuiteCRM-Core api calls depend on this (calls to
api/graphql) if re-rewrites are not allowed you will get a404when calling the api.
In apache webserver this can be achieved by enabling mod-rewrite and configuring the vhost.
It is highly recommended that you update the webroot or configure vhost to point to the public folder inside SuiteCRM folder. If the webroot is pointing to SuiteCRM folder instead of the public folder, all the files under SuiteCRM folder maybe be exposed to the web.
On your vhost configuration you need something like:
Helpfull resources:
-
Symfony documentation on how to setup webserver (apache and others)
-
DigitalOcean - Tutorial on how to setup mod_write (apache)
-
Note from the above you would only need:
-
Section 1—How to Activate Mod_Rewrites
-
How to permit changes in the .htaccess file:
-
-
1.4 Configure php error_reporting
Please make sure that notices aren’t considered on error_handling. For that you can update the error handling entry in php.ini
error_reporting = E_ALL & ~E_DEPRECATED & ~E_STRICT & ~E_NOTICE & ~E_WARNINGHelpfull Resources
Please check the Helpfull Resources section from Install required software for instructions on where to find php.ini
1.5 (optional) (recommended for production) Enable op cache
Enabling op cache will greatly improve performance. Though its only recommended for production environments.
To enable op cache you have to enable and configure it on php.ini.
-
The following example is based on the Symfony documentation that you will find in the
Helpfull resources
[opcache]
; Determines if Zend OPCache is enabled
zend_extension=opcache.so
opcache.enable=1

; The OPcache shared memory storage size.
opcache.memory_consumption=256

; The maximum number of keys (scripts) in the OPcache hash table.
; Only numbers between 200 and 100000 are allowed.
opcache.max_accelerated_files=20000

; When disabled, you must reset the OPcache manually or restart the
; webserver for changes to the filesystem to take effect.
opcache.validate_timestamps=0
Helpfull resources:
For a deeper understanding of the above we recommend reading the following:
-
ApiPlatform documentation - Performance
-
From the ApiPlatform documentation have have a look at
Enabling the Metadata Cache
-
2. Downloading and Setting up SuiteCRM
2.1 Downloading the latest SuiteCRM files
Unless you want to setup a development environment, you should download the pre-built installable packages available for download on suitecrm.com
See the SuiteCRM 8 releases page
2.2 Copy the files to your webserver root
After you download the package
-
Unzip the pre-build installable package.
-
Copy the the files to your web server web root.
For apache webserver the web root is usually under /var/www or /var/www/html
Please consider the DocumentRoot you have set on your vhost (if using apache). See 1.3 Configuring URL re-writes
Adding the files to the web root is the most typical install method, but you can have different setups, like subdomains and others.
2.3 Set permissions
Set the required permissions
If you are using the terminal you can do this by running:
find . -type d -not -perm 2755 -exec chmod 2755 {} \;
find . -type f -not -perm 0644 -exec chmod 0644 {} \;
find . ! -user www-data -exec chown www-data:www-data {} \;
chmod +x bin/console
Please have in mind that:
-
The user and group name (in the above example
www-data) needs to be replaced by the actual system user and group that your webserver runs under. This varies depending on your operating system. Common web server users are as follows:-
www-data(Ubuntu Linux/Apache) -
apache(Linux/Apache)
-
-
If the group name differs from the username apache is running with, you may need
0664instead of0644, and2775instead of2755
2.4 (optional) Creating the database
Depending on your setup, you maybe required to create the database before you go through the install process.
The install process will then create the needed tables.
3. Running the installer
From SuiteCRM version 8 and above you have two ways to run installer:
Following you can find documentation on how to install using the web installer or the cli.
3.1 Option 1: Installing using the install page
To run the web installer go to https://<your-suite-crm-instance-path>/
Since you are not installed this should re-direct you to https://<your-suite-crm-instance-path>/#/install
Where you should see a view like the following
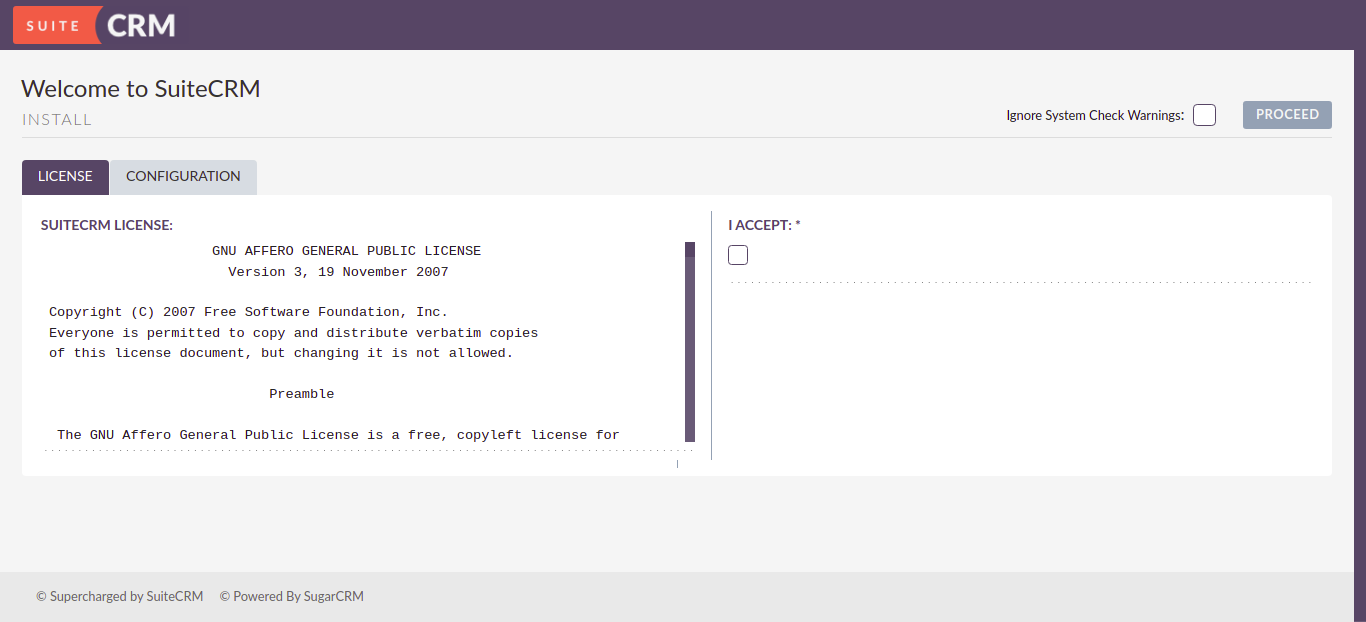
2.1.1 Accept the license
In order to be able to install you’ll have to accept the license by checking the I ACCEPT checkbox.
2.1.2 Setup basic system configuration
The next step is to add the base system configuration in order for your system to work.
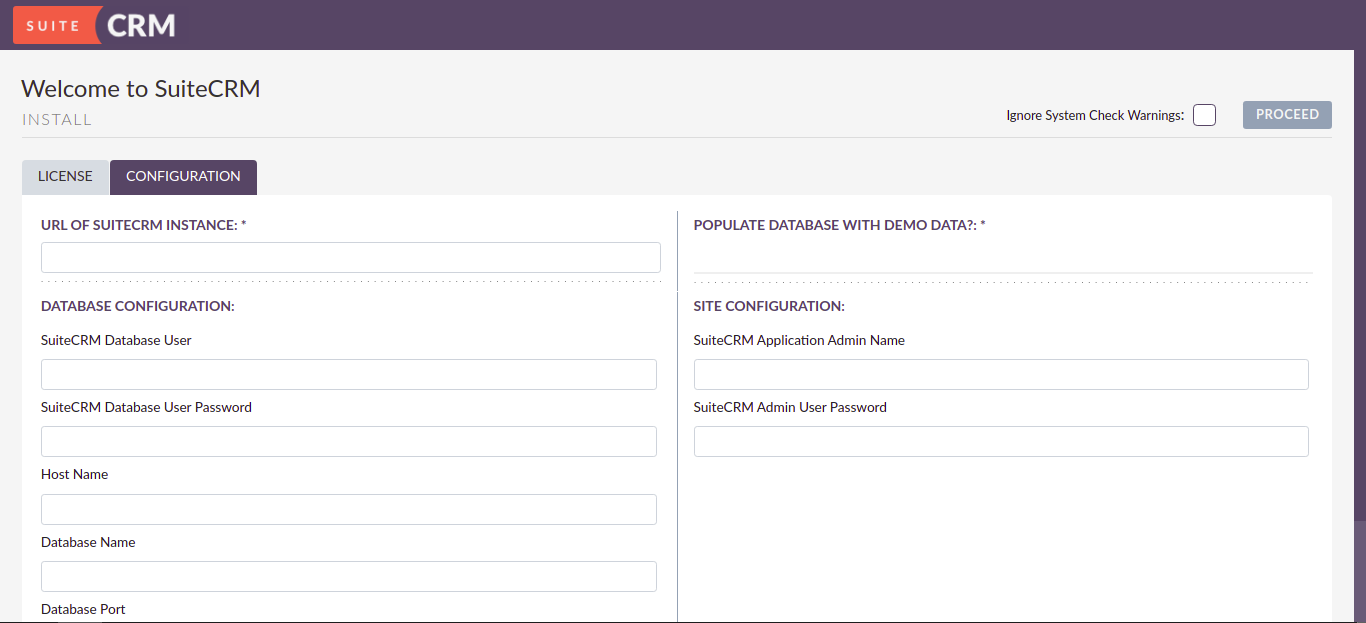
On this page apart from Ignore system check warnings all fields are required and need to be set a value.
In this tab you will find the following configurations:
2.1.2.1 URL OF SUITECRM INSTANCE

In the above field you should set the url where your SuiteCRM instance is located. A few example:
Tip: you can simply copy the url from you browser’s address bar
2.1.2.2 SuiteCRM Database User

In the above field you should set the user name for accessing your database.
Ensure that the Database Administrator you specify has the permissions to create and write to the SuiteCRM database.
2.1.2.3 SuiteCRM Database User Password

In the above field you should set the password for accessing your database.
2.1.2.4 Host Name

In the above field you should set the host of your database.
In some systems when using localhost doctrine will try to use socket connection. However, socket connection is not supported at the moment, so in such cases, its maybe best to try with the ip, e.g. 127.0.0.1
2.1.2.5 Database Name

In the above field you should set the name you want for the databases that will be created on your host during the install process, e.g. suite or suitecrm or another valid db name.
2.1.2.6 Database Port

In the above field is set to the default port user in mysql and mariadb database engines. You should only change it in case your database host is using a different port.
2.1.2.7 POPULATE DATABASE WITH DEMO DATA

In the above field you can set if, during the install process, you want to pre-populate your database with demo data.
2.1.2.8 SuiteCRM Application Admin Name

In the above field you can set the username for your SuiteCRM instance’s administrator user, e.g. admin or any other username you want to give.
2.1.2.9 SuiteCRM Admin User Password

In the above field you can set the password for your SuiteCRM instance’s administrator user.
2.1.3 Ignoring install warnings

Before running the install process, SuiteCRM is going to check for some system requirements, like max upload file size or memory limit. Some of these checks are optional, meaning that you can install the system without those.
In case you want to proceed with the installation even if there are warnings you can check the Ignore System Check Warnings checkbox
2.1.4 Run the install
After you have accepted the license and set correct values for all the configurations you can click on Proceed.
This is going to trigger the install process. As explained before the install process will first check for some system requirements.
If there any errors during the validation, the install process will halt and a modal will open with a description of the checks that failed.
If all the checks passed the system will continue on to the install process. During the install process you will see a loading spinner on the page. This process can take some time.
After the install process finishes you will be re-directed to the login page.
2.1.6 Access the app
Try to login into your instance
3.2 Option 2: Installing using the cli
3.2.1 Install the system
-
Run command:
-
Option 1 - Run
./bin/console suitecrm:app:installwithout any options, the command will ask you for the required options -
Option 2 - Run
./bin/console suitecrm:app:installin one line by passing the required options the. See the section below for more detail.
-
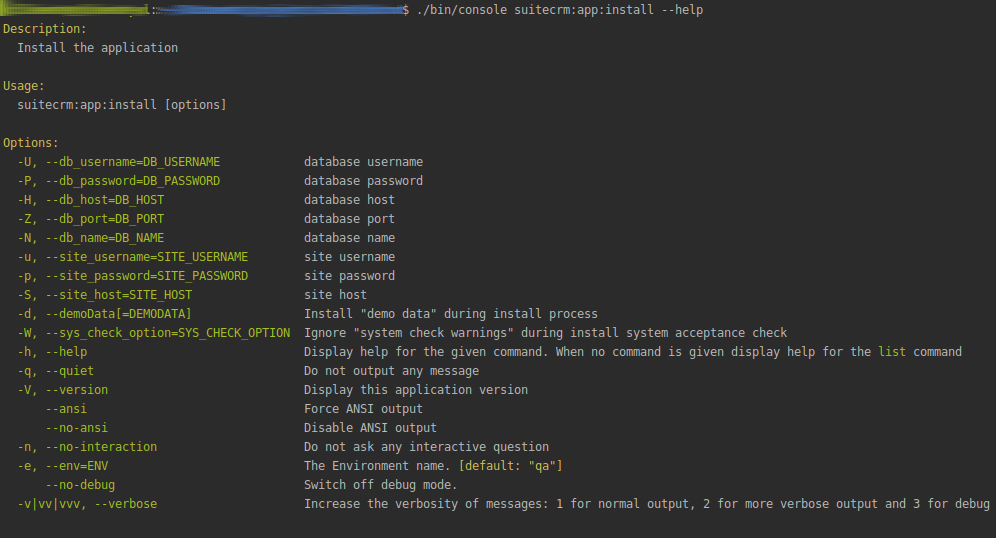
./bin/console suitecrm:app:install -u "admin_username" -p "admin_password" -U "db_user" -P "db_password" -H "db_host" -N "db_name" -S "site_url" -d "demo_data"Further Info
#Example
./bin/console suitecrm:app:install -u "admin" -p "pass" -U "root" -P "dbpass" -H "mariadb" -N "suitecrm" -S "https://yourcrm.com/" -d "yes"
To get more information on the supported arguments you can run: ./bin/console suitecrm:app:install --help. Which should show a list similar to the following:
The following sub-sections provide a brief explanation of each parameter you can set
3.2.1.1 site_url
In the above parameter you should set the url where your SuiteCRM instance is located. A few example:
Tip: you can simply copy the url from you browser’s address bar
3.2.1.2 db_user
In the above parameter you should set the user name for accessing your database.
Ensure that the Database Administrator you specify has the permissions to create and write to the SuiteCRM database.
3.2.1.3 db_password
In the above parameter you should set the password for accessing your database.
3.2.1.4 db_host
In the above parameter you should set the host of your database.
in some systems when using localhost doctrine will try to use socket connection. However, socket connection is not supported at the moment, so in such cases, its maybe best to try with the ip, e.g. 127.0.0.1
3.2.1.5 db_name
In the above parameter you should set the name you want for the databases that will be created on your host during the install process, e.g. suite or suitecrm or another valid db name.
3.2.1.6 db_port
In the above parameter is set to the default port user in mysql and mariadb database engines. You should only change it in case your database host is using a different port.
3.2.1.7 demo_data
In the above parameter you can set if, during the install process, you want to pre-populate your database with demo data.
Possible values: 'yes' , 'no'.
3.2.1.8 admin_username
In the above parameter you can set the username for your SuiteCRM instance’s administrator user, e.g. admin or any other username you want to give.
3.2.1.9 admin_password
In the above parameter you can set the password for your SuiteCRM instance’s administrator user.
3.2.1.10 sys_check_option
Ignoring install warnings
Before running the install process, SuiteCRM is going to check for some system requirements, like max upload file size or memory limit. Some of these checks are optional, meaning that you can install the system without those.
In case you want to proceed with the installation even if there are warnings you can check the Ignore System Check Warnings checkbox
Possible values: 'true' (for ignoring) , 'false' (for not ignoring).
3.2.2 Re-set permissions
After allowing time for the installation to complete, again set permissions as done in step 2.3 Set permissions.
3.2.3 Access the app
You should now be able to access the instance at the https://<your-suite-crm-instance-path>;